The opportunity now given to play with a mainframe computer in your GNS3 network simulator environment, you just need to follow the steps below.
  =========  ==========    =====       =====
  =========  ============  ======     ======
     ===       ===   ====    =====   =====
     ===       =========     ====== ======
     ===       ========      =============
     ===       =========     =============
     ===       ===   ====    ===  ===  ===
  =========  ============  =====   =   =====
  =========  ==========    =====       =====
Before you start with the project, you have to read a bit about what components you will need to integrate together:
Debian – https://en.wikipedia.org/wiki/Debian
Hercules – https://en.wikipedia.org/wiki/Hercules_(emulator)
IBM z/OS – https://en.wikipedia.org/wiki/Z/OS
GNS3 – https://en.wikipedia.org/wiki/Graphical_Network_Simulator-3
You have to complete the following requirements:
- Install GNS3 (2-2-0)
- Install Debian 10 (preferably on Vmware first. The Vmware system will be the base system to make the working image that later on will be deployed to GNS3)
- Install Hercules Mainframe emulator software, c3270 terminal emulator and screen on the top of Debian 10 Vmware Image (
apt-get install -y c3270 hercules screen ) - Find an IBM z/OS Installer Media: ‘IBM ZOS 1.10’ . You have to find on the internet the z/OS ADCD 1.10 (Development and Support) release which has the embedded disks and the minimum hercules configuration.
You should find an Image Set that contains both the z/OS 1.10 disk images and adjusted Hercules configuration like this:
#********************************************************************
# CONFIGURAGION FILE FOR ADCD Z/OS 1.10 SUMMER *
#********************************************************************
# FOR ALL THE LOADPARM OPTIONS VISIT: *
# http://dtsc.dfw.ibm.com/MVSDS/'HTTPD2.ADCD.GLOBAL.HTML(READ110S)' *
#********************************************************************
# CUSTOM LOADPARM OPTIONS *
# SA - LOADS ALL LIBRARIES AND STARTS UP AUTOMATION (JES2) *
# J3 - LOADS ALL LIBRARIES AND STARTS UP BASIC z/OS SYSTEM (JES3) *
#********************************************************************
ARCHMODE z/Arch
OSTAILOR z/OS
CPUSERIAL 08A89F
CPUMODEL 7060
LPARNAME DUZA
LOADPARM 0A82SAM1
MODEL UBUNTU
PLANT ZZ
MAINSIZE 1856
HERCPRIO -20
CPUPRIO -20
DEVPRIO -20
DEVTMAX 0
TODRAG 2
NUMCPU 4
SYSEPOCH 1900
TZOFFSET -0000
PANTITLE "ADCD z/OS 1.10 on Hercules"
PANRATE FAST
CNSLPORT 23
PGMPRDOS LICENSED
#********************************************************************
# SYMBOLS DEFINITION *
#********************************************************************
DEFSYM DASD "/home/ehrocha/hercules/images/Z110/DASD"
DEFSYM PROD "/home/ehrocha/hercules/images/Z110/PROD"
DEFSYM PRTR "/home/ehrocha/hercules/images/Z110/PRTR"
#********************************************************************
# ORIGINAL ADCD z/OS 1.10 SUMMER IMAGES *
#********************************************************************
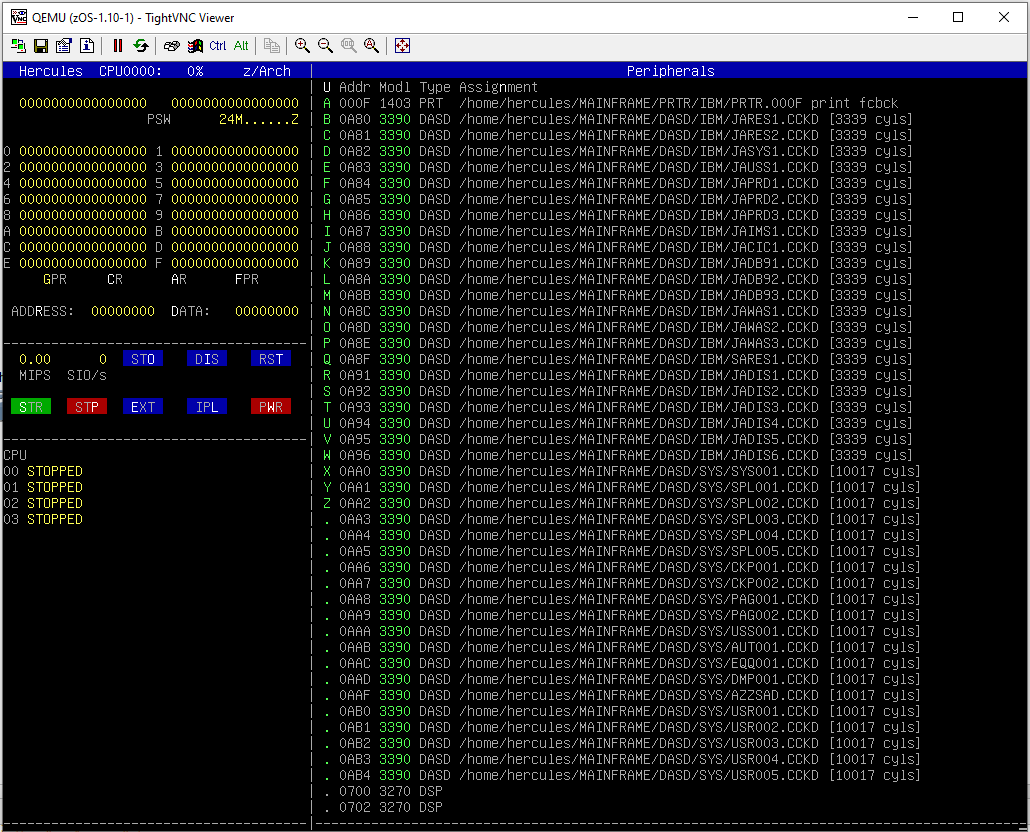
000F 1403 $(PRTR)/IBM/PRTR.000F
0A80 3390 $(DASD)/IBM/JARES1.CCKD
0A81 3390 $(DASD)/IBM/JARES2.CCKD
0A82 3390 $(DASD)/IBM/JASYS1.CCKD
0A83 3390 $(DASD)/IBM/JAUSS1.CCKD
0A84 3390 $(DASD)/IBM/JAPRD1.CCKD
0A85 3390 $(DASD)/IBM/JAPRD2.CCKD
0A86 3390 $(DASD)/IBM/JAPRD3.CCKD
0A87 3390 $(DASD)/IBM/JAIMS1.CCKD
0A88 3390 $(DASD)/IBM/JACIC1.CCKD
0A89 3390 $(DASD)/IBM/JADB91.CCKD
0A8A 3390 $(DASD)/IBM/JADB92.CCKD
0A8B 3390 $(DASD)/IBM/JADB93.CCKD
0A8C 3390 $(DASD)/IBM/JAWAS1.CCKD
0A8D 3390 $(DASD)/IBM/JAWAS2.CCKD
0A8E 3390 $(DASD)/IBM/JAWAS3.CCKD
0A8F 3390 $(DASD)/IBM/SARES1.CCKD #LOADPARM 0A99SAM1
0A91 3390 $(DASD)/IBM/JADIS1.CCKD
0A92 3390 $(DASD)/IBM/JADIS2.CCKD
0A93 3390 $(DASD)/IBM/JADIS3.CCKD
0A94 3390 $(DASD)/IBM/JADIS4.CCKD
0A95 3390 $(DASD)/IBM/JADIS5.CCKD
0A96 3390 $(DASD)/IBM/JADIS6.CCKD
#********************************************************************
# CUSTOM IMAGES *
#********************************************************************
# VOLUME NAMING CONVENTION *
# .-----> 1 CHAR SYSPLEX NAME (SYSPLX "A") *
# |.--.-> 3 CHAR PURPOSE RES=SYSRES SPL=SPOOL CKP=CHECKPOINT *
# || \> USR=USER CFG=SYS PAG=PAGE SMS=SMS *
# || .-> SEQUENCE OR SYSCLONE FOR CONFIGURATION VOLUME *
# VV V *
# xxxxxx *
#********************************************************************
0AA0 3390 $(DASD)/SYS/SYS001.CCKD
0AA1 3390 $(DASD)/SYS/SPL001.CCKD
0AA2 3390 $(DASD)/SYS/SPL002.CCKD
0AA3 3390 $(DASD)/SYS/SPL003.CCKD
0AA4 3390 $(DASD)/SYS/SPL004.CCKD
0AA5 3390 $(DASD)/SYS/SPL005.CCKD
0AA6 3390 $(DASD)/SYS/CKP001.CCKD
0AA7 3390 $(DASD)/SYS/CKP002.CCKD
0AA8 3390 $(DASD)/SYS/PAG001.CCKD
0AA9 3390 $(DASD)/SYS/PAG002.CCKD
0AAA 3390 $(DASD)/SYS/USS001.CCKD
0AAB 3390 $(DASD)/SYS/AUT001.CCKD
0AAC 3390 $(DASD)/SYS/EQQ001.CCKD
0AAD 3390 $(DASD)/SYS/DMP001.CCKD
0AAF 3390 $(DASD)/SYS/AZZSAD.CCKD
0AB0 3390 $(DASD)/SYS/USR001.CCKD
0AB1 3390 $(DASD)/SYS/USR002.CCKD
0AB2 3390 $(DASD)/SYS/USR003.CCKD
0AB3 3390 $(DASD)/SYS/USR004.CCKD
0AB4 3390 $(DASD)/SYS/USR005.CCKD
#********************************************************************
# DISPLAY TERMINALS *
#********************************************************************
0700 3270
#0701 3270
0702.14 3270
#********************************************************************
# CTCI COMMUNICATION DEVICES *
#********************************************************************
0E20.2 LCS 10.0.1.20
#********************************************************************
# HOST OS TIPS/TRICKS *
#********************************************************************
#sudo /sbin/sysctl -w net.ipv4.conf.eth0.proxy_arp=1
#sudo /sbin/sysctl -w net.ipv4.conf.eth0.proxy_arp=1Create a ‘hercules’ local user on your debian machine
adduser herculesSetup a file structure like this:
hercules@hercules:~$ cd /home/hercules
hercules@hercules:~$ ls
MAINFRAME
You should have the CONF, DASD and PRTR folders
hercules@hercules:~/MAINFRAME$ ls -all
total 20
drwxr-xr-x 5 hercules hercules 4096 Oct 12 10:25 .
drwxr-xr-x 6 hercules hercules 4096 Oct 14 10:11 ..
drwxr-xr-x 2 hercules hercules 4096 Oct 16 13:48 CONF
drwxr-xr-x 4 hercules hercules 4096 Oct 13 14:02 DASD
drwxr-xr-x 2 hercules hercules 4096 Oct 12 10:25 PRTR
Hercules config:
hercules@hercules:~/MAINFRAME/CONF$ ls -all
total 16
drwxr-xr-x 2 hercules hercules 4096 Oct 19 13:56 .
drwxr-xr-x 5 hercules hercules 4096 Oct 12 10:25 ..
-rw-r--r-- 1 hercules hercules 4966 Oct 16 13:48 ADCD_LINUX.CONF
Modify the following sections in the config
-DASD / PROT/ PRTR sections location (path to the right absolute path in your system, for example /home/hercules/MAINFRAME)
-CNSLPORT (to 2323)
-CTCI COMMUNICATION DEVICES (assign two LAN ip address that the emualted mainframe can use on your local network)
cat /hercules/MAINFRAME/CONF/ADCD_LINUX.CONF
#********************************************************************
# CONFIGURAGION FILE FOR ADCD Z/OS 1.10 SUMMER                      *
#********************************************************************
# FOR ALL THE LOADPARM OPTIONS VISIT:                               *
# http://dtsc.dfw.ibm.com/MVSDS/'HTTPD2.ADCD.GLOBAL.HTML(READ110S)' *
#********************************************************************
# CUSTOM LOADPARM OPTIONS                                           *
# SA - LOADS ALL LIBRARIES AND STARTS UP AUTOMATION (JES2)          *
# J3 - LOADS ALL LIBRARIES AND STARTS UP BASIC z/OS SYSTEM (JES3)   *
#********************************************************************

ARCHMODE  z/Arch
OSTAILOR  z/OS
CPUSERIAL 08A89F
CPUMODEL  7060
LPARNAME  DUZA
LOADPARM  0A82SAM1
MODEL     UBUNTU
PLANT     ZZ
MAINSIZE  1856
HERCPRIO  -20
CPUPRIO   -20
DEVPRIO   -20
DEVTMAX   0
TODRAG    2
NUMCPU    4
SYSEPOCH  1900
TZOFFSET  -0000
PANTITLE  "ADCD z/OS 1.10 on Hercules"
PANRATE   FAST
CNSLPORT  2323
PGMPRDOS  LICENSED

#********************************************************************
# SYMBOLS DEFINITION                                                *
#********************************************************************

DEFSYM DASD "/home/hercules/MAINFRAME/DASD"
DEFSYM PROD "/home/hercules/MAINFRAME/PROD"
DEFSYM PRTR "/home/hercules/MAINFRAME/PRTR"

#********************************************************************
# ORIGINAL ADCD z/OS 1.10 SUMMER IMAGES                             *
#********************************************************************

000F    1403 $(PRTR)/IBM/PRTR.000F

0A80    3390 $(DASD)/IBM/JARES1.CCKD
0A81    3390 $(DASD)/IBM/JARES2.CCKD
0A82    3390 $(DASD)/IBM/JASYS1.CCKD
0A83    3390 $(DASD)/IBM/JAUSS1.CCKD
0A84    3390 $(DASD)/IBM/JAPRD1.CCKD
0A85    3390 $(DASD)/IBM/JAPRD2.CCKD
0A86    3390 $(DASD)/IBM/JAPRD3.CCKD
0A87    3390 $(DASD)/IBM/JAIMS1.CCKD
0A88    3390 $(DASD)/IBM/JACIC1.CCKD
0A89    3390 $(DASD)/IBM/JADB91.CCKD
0A8A    3390 $(DASD)/IBM/JADB92.CCKD
0A8B    3390 $(DASD)/IBM/JADB93.CCKD
0A8C    3390 $(DASD)/IBM/JAWAS1.CCKD
0A8D    3390 $(DASD)/IBM/JAWAS2.CCKD
0A8E    3390 $(DASD)/IBM/JAWAS3.CCKD
0A8F    3390 $(DASD)/IBM/SARES1.CCKD        #LOADPARM  0A99SAM1

0A91    3390 $(DASD)/IBM/JADIS1.CCKD
0A92    3390 $(DASD)/IBM/JADIS2.CCKD
0A93    3390 $(DASD)/IBM/JADIS3.CCKD
0A94    3390 $(DASD)/IBM/JADIS4.CCKD
0A95    3390 $(DASD)/IBM/JADIS5.CCKD
0A96    3390 $(DASD)/IBM/JADIS6.CCKD

#********************************************************************
# CUSTOM IMAGES                                                     *
#********************************************************************
# VOLUME NAMING CONVENTION                                          *
# .-----> 1 CHAR SYSPLEX NAME (SYSPLX "A")                          *
# |.--.-> 3 CHAR PURPOSE RES=SYSRES SPL=SPOOL CKP=CHECKPOINT        *
# ||   \>                USR=USER CFG=SYS PAG=PAGE SMS=SMS          *
# ||  .-> SEQUENCE OR SYSCLONE FOR CONFIGURATION VOLUME             *
# VV  V                                                             *
# xxxxxx                                                            *
#********************************************************************
0AA0    3390 $(DASD)/SYS/SYS001.CCKD
0AA1    3390 $(DASD)/SYS/SPL001.CCKD
0AA2    3390 $(DASD)/SYS/SPL002.CCKD
0AA3    3390 $(DASD)/SYS/SPL003.CCKD
0AA4    3390 $(DASD)/SYS/SPL004.CCKD
0AA5    3390 $(DASD)/SYS/SPL005.CCKD
0AA6    3390 $(DASD)/SYS/CKP001.CCKD
0AA7    3390 $(DASD)/SYS/CKP002.CCKD
0AA8    3390 $(DASD)/SYS/PAG001.CCKD
0AA9    3390 $(DASD)/SYS/PAG002.CCKD
0AAA    3390 $(DASD)/SYS/USS001.CCKD
0AAB    3390 $(DASD)/SYS/AUT001.CCKD
0AAC    3390 $(DASD)/SYS/EQQ001.CCKD
0AAD    3390 $(DASD)/SYS/DMP001.CCKD
0AAF    3390 $(DASD)/SYS/AZZSAD.CCKD

0AB0    3390 $(DASD)/SYS/USR001.CCKD
0AB1    3390 $(DASD)/SYS/USR002.CCKD
0AB2    3390 $(DASD)/SYS/USR003.CCKD
0AB3    3390 $(DASD)/SYS/USR004.CCKD
0AB4    3390 $(DASD)/SYS/USR005.CCKD

#********************************************************************
# DISPLAY TERMINALS                                                 *
#********************************************************************
0700    3270
#0701   3270
0702.14 3270

#********************************************************************
# CTCI COMMUNICATION DEVICES                                        *
#********************************************************************
0E20.2 3088 CTCI /dev/net/tun 1500 192.168.2.30 192.168.2.31 255.255.255.255

#********************************************************************
# HOST OS TIPS/TRICKS                                               *
#********************************************************************
#sudo /sbin/sysctl -w net.ipv4.conf.eth0.proxy_arp=1
#sudo /sbin/sysctl -w net.ipv4.conf.eth0.proxy_arp=1
Start-up the z/OS mainframe in hercules (this stage you can still stay under vmware, not necessary to move the image yet under GNS)
Specs for the virtual machine bootstrapping first quick the z/os:
- CPU: 8x preferred for the first run, later 4x cpu enough for running
- Memory: 16GB
- Disk: minimum 50GB, 100GB preferred
Start a terminal for running the hercules daemon
screen -S herculesStart the hercules mainframe emulator binary pointing to the proper z/os config
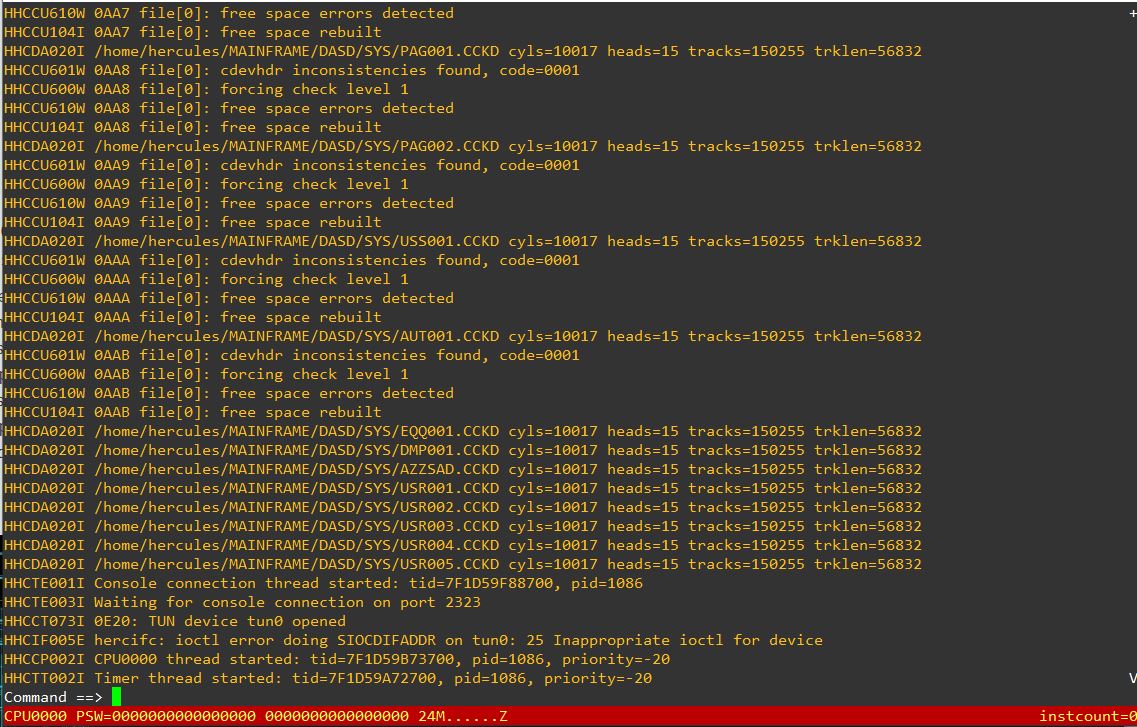
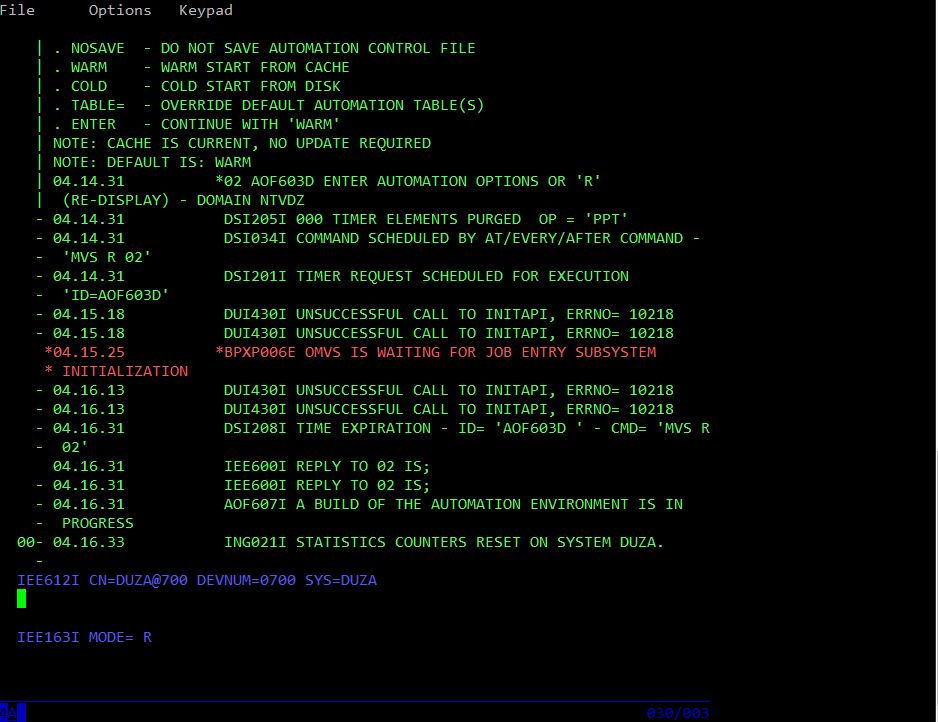
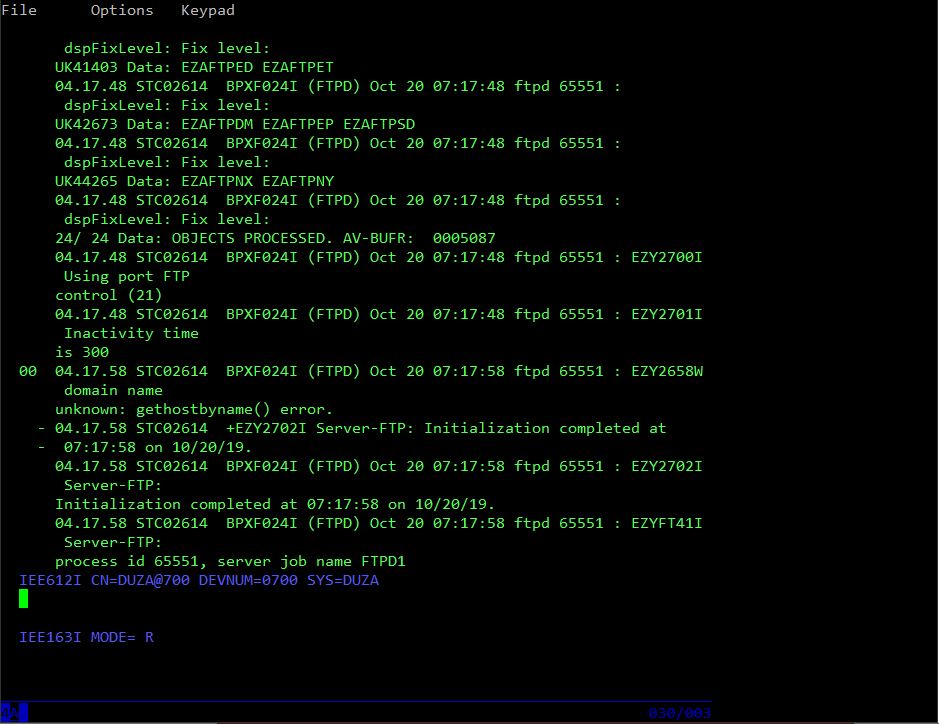
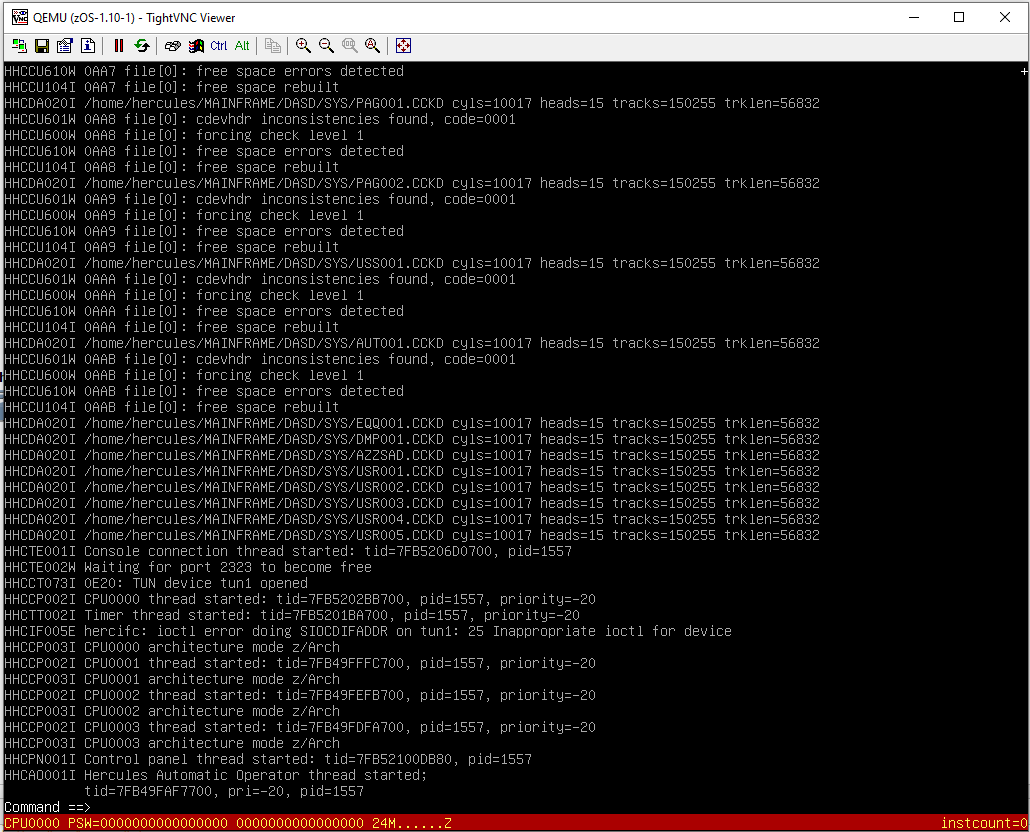
sudo hercules -f ~/MAINFRAME/CONF/ADCD_LINUX.CONFAfter hercules started up, you should see the following console messges:
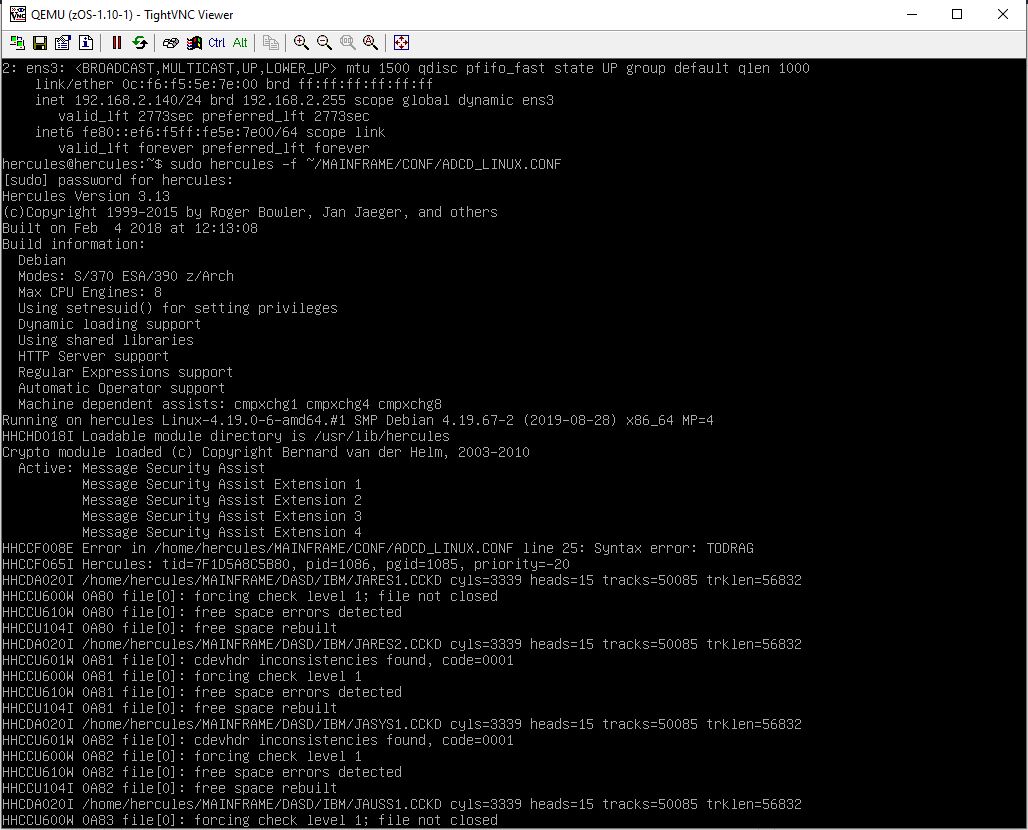
Detach the ‘hercules session
ctrl + a dOpen a terminal session for the c3270 terminal client
screen -S c3270
c3270 localhost 2323
Detach the c3270 session
CTRL + a + dAttach back the ‘hercules’ session
screen -r herculesStartup the z/os mainframe with IPL command
After issuing the ipl comand, this can either take up to 60-90 minutes for the first start (based on your machine speed). When you start second time it can be done within 10 minutes.
ipl a80
You can switch back to the c3270 terminal to see the console logs, when the c3270 console messages stops flowing, you should be ready to with a login
Create a secondary c3270 terminal
screen -S c3270-2Connect to the c3270 again in the second terminal, this stage you should be able to see the z/os login screen:
c3270 localhost 2323
Input: TSO
Hit Enter

Password: SYS1

Hit Enter Again
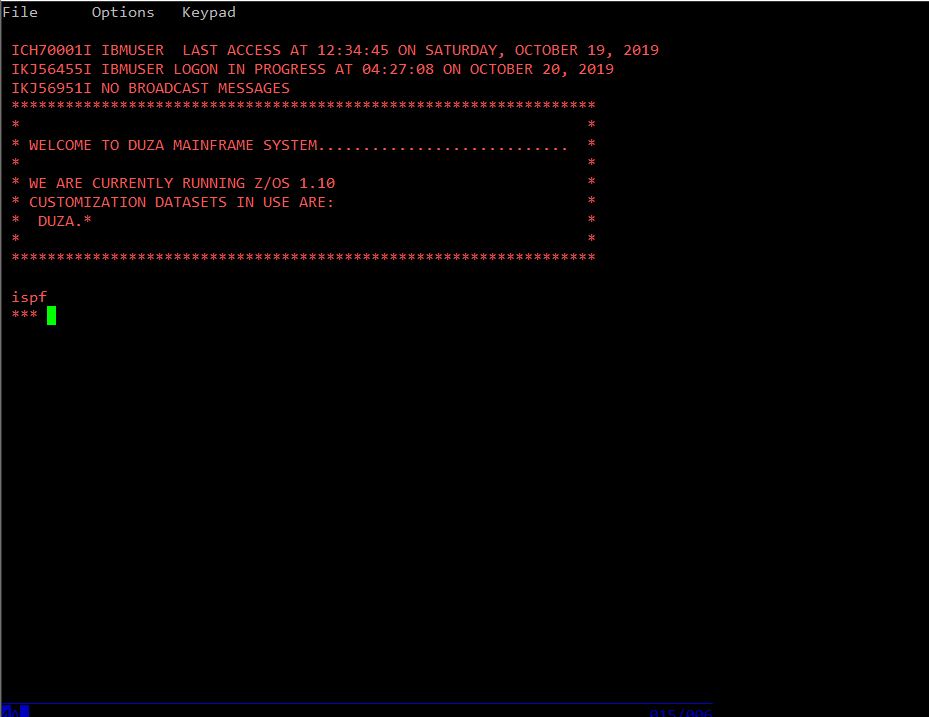
You logged in:
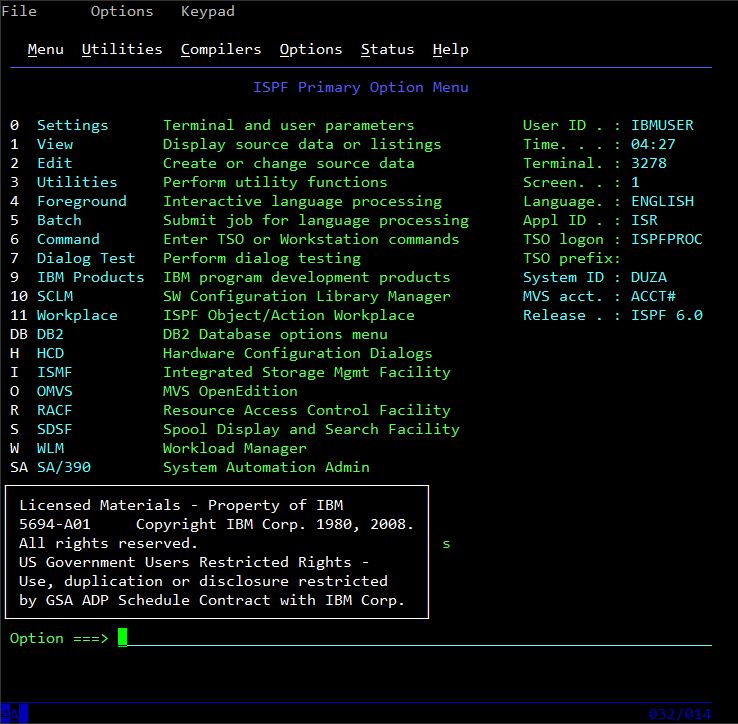
You will need to setup the network, type “3.4” to the Option ===> prompt
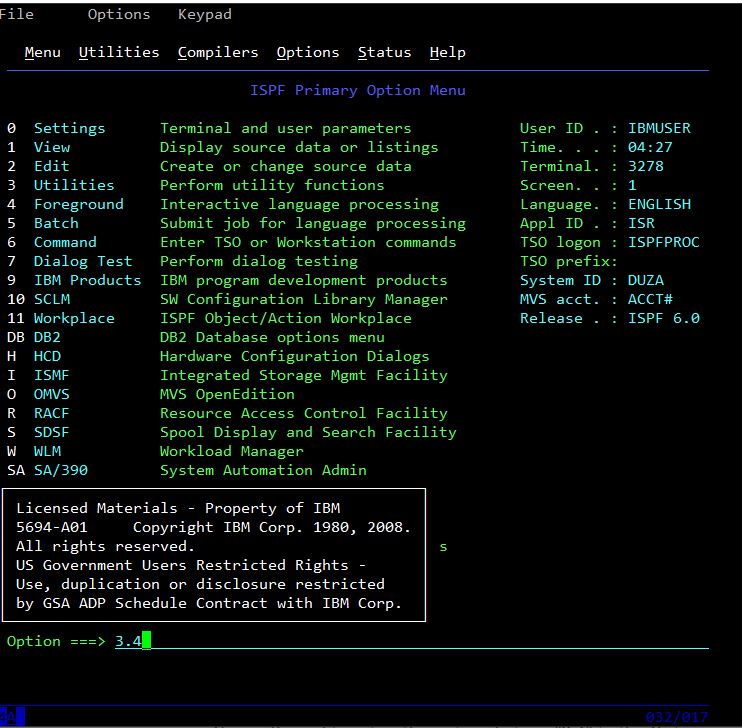
Hit Enter
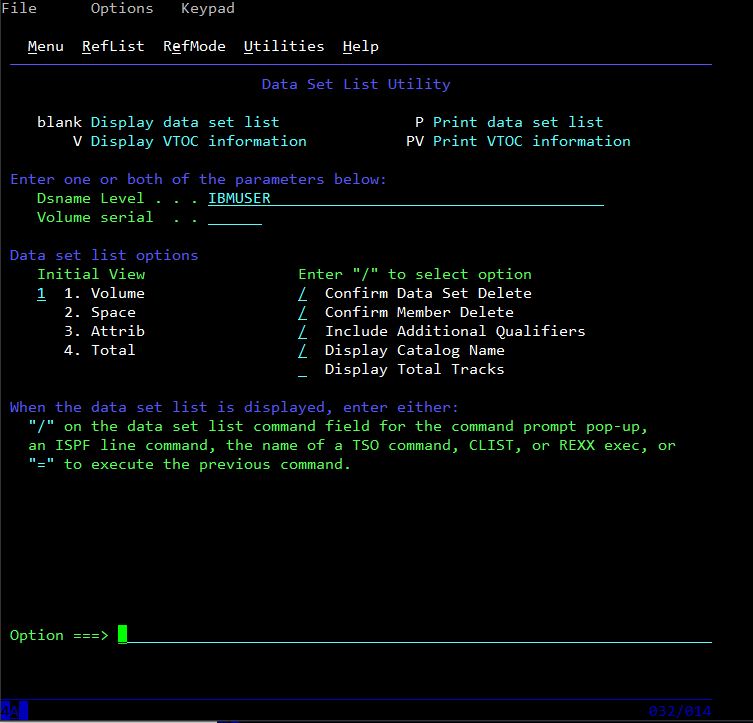
You will need to replace IBMUSER Dsname Level to ‘DUZA’
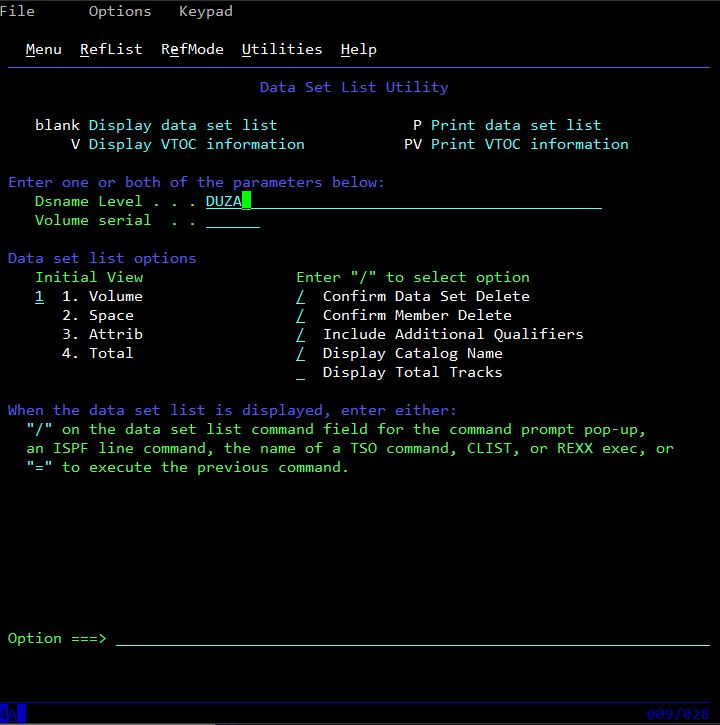
Hit Enter
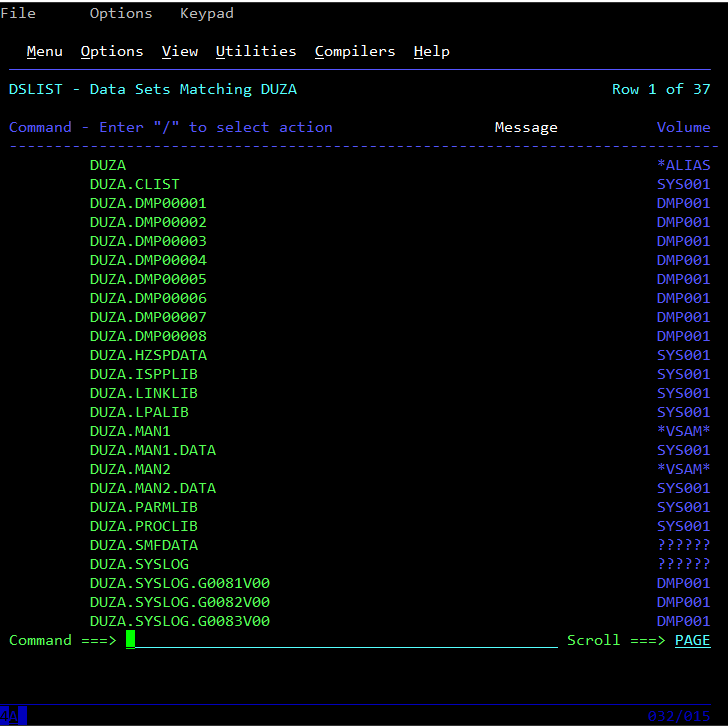
Page / navigate with F8 key to DUZA.TCPPARMS line
Stand with the cursor before DUZA.TCPPARMS with 3 characters and input an ‘E’ character
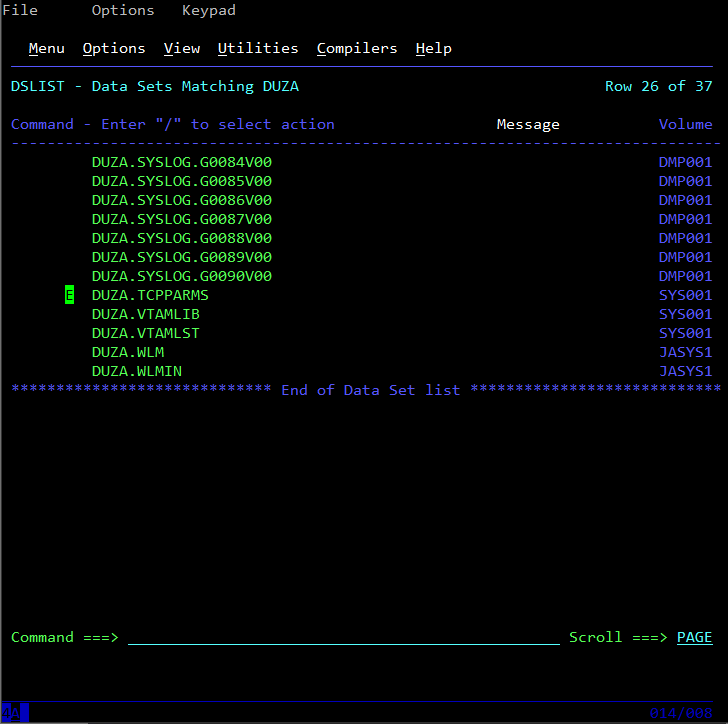
Hit Enter
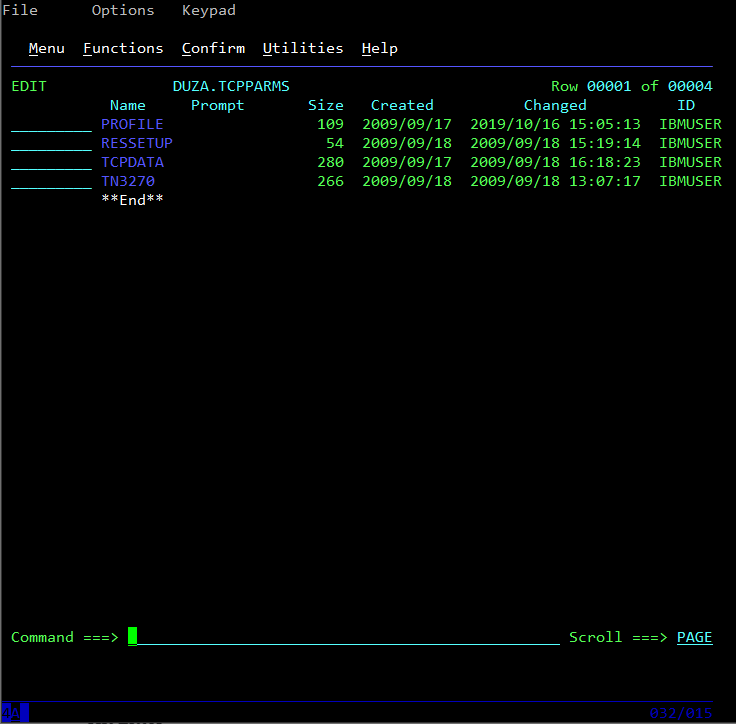
Stand to line Profile and input ‘E’ character to the first character position
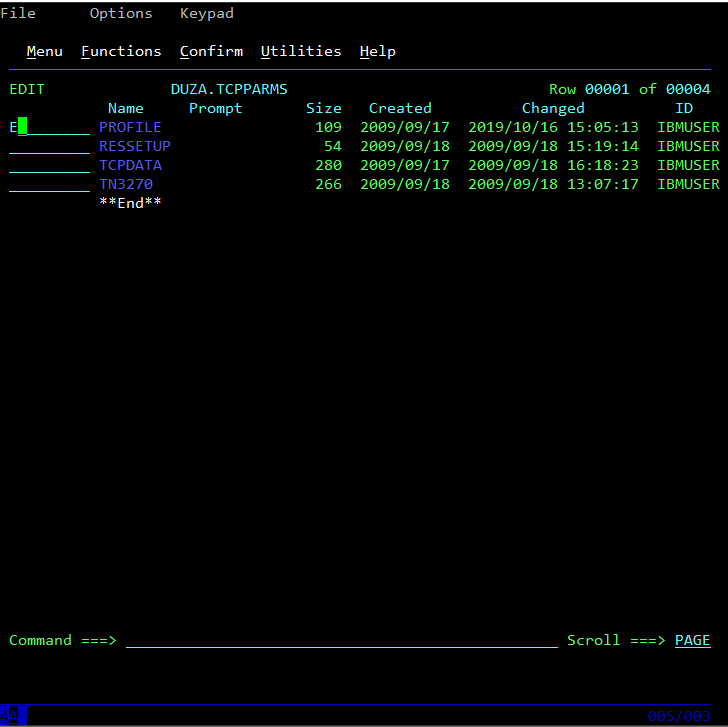
Hit Enter
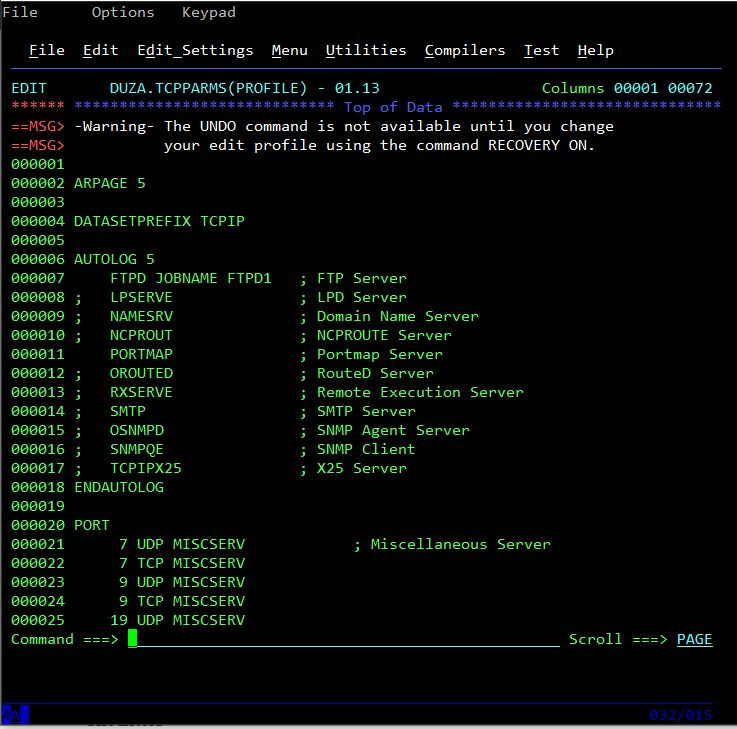
Navigate to aroind line 90 and make sure you have the same settings setup, especially for CTCA1 DE\viC|E, CTC1 LINK and end of the config START CTCA1
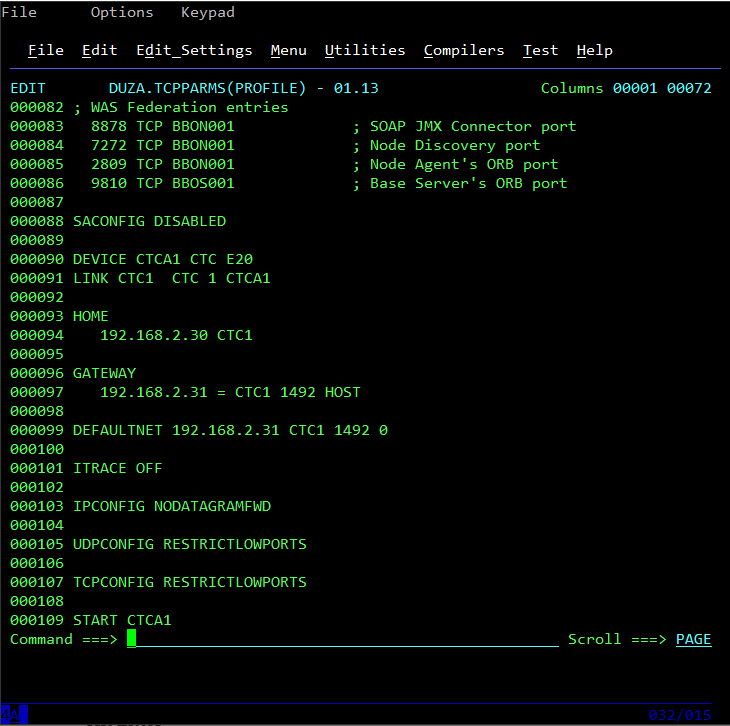
000090 DEVICE CTCA1 CTC e20
000091 LINK CTC1 CTC 1 CTCA1
000092
000093 HOME
000094 192.168.0.210 CTC1
000095
000096 GATEWAY
000097 192.168.0.1 = CTC1 1492 HOST
000098
000099 DEFAULTNET 192.168.0.5 CTC1 1492
...
000109 START CTCA1
Save the modified file – issue SAVE to the COMMAND input area and hit enter
SAVEEnd editing with issue the ‘END’ command and hit an Enter:
ENDDetach this c3270-2 terminal and go back to the first c3270 console terminal and re-start TCP/IP networking
STOP TCPIPHit Enter
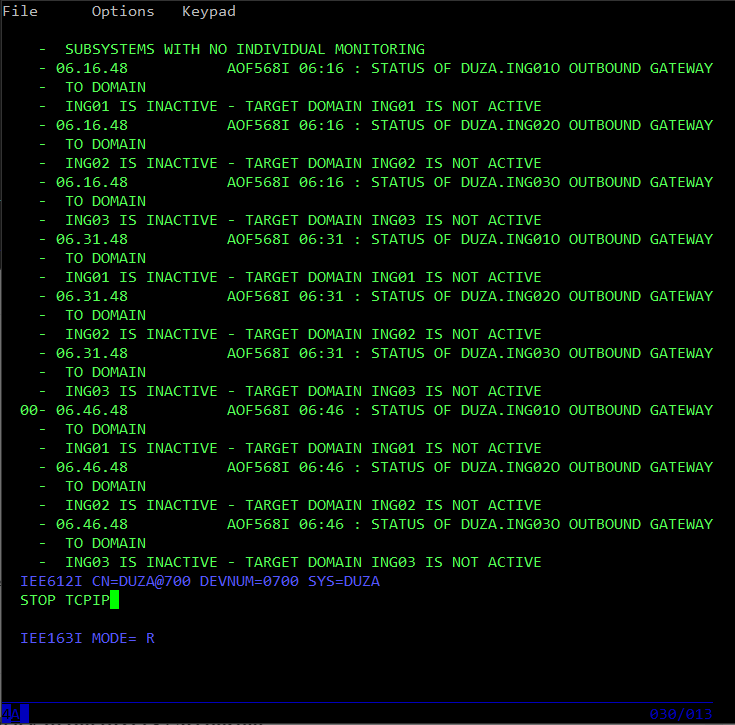
After a few minutes you should get that TCPIP is STOPPED
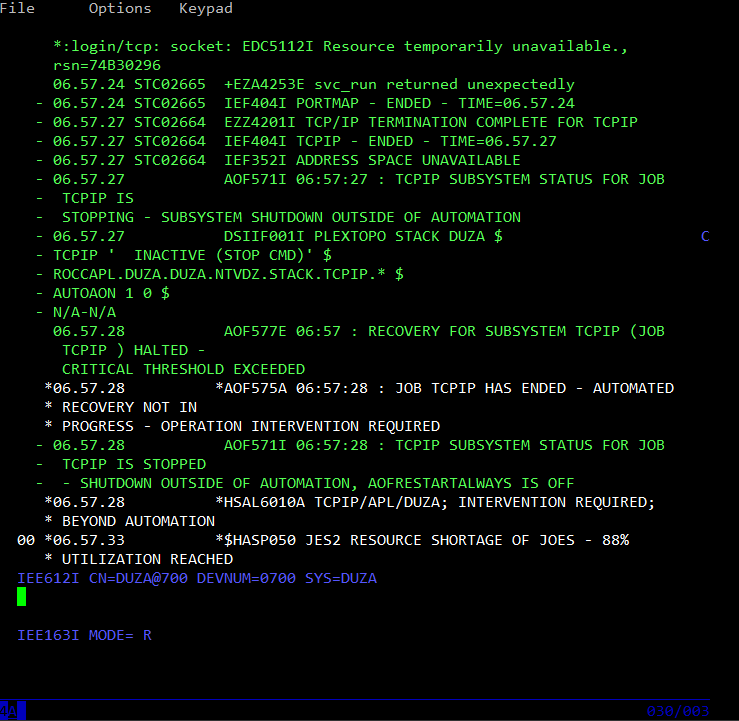
Issue START TCPIP and hit Enter
START TCPIP
You need to enable IP forwarding on the Debian host, which running Hercules:
root@hercules:~# echo '1' > /proc/sys/net/ipv4/conf/all/proxy_arp
root@hercules:~# echo '1' > /proc/sys/net/ipv4/conf/all/forwarding
Validate that the virtual mainframe is accessible through TCP/IP connection:
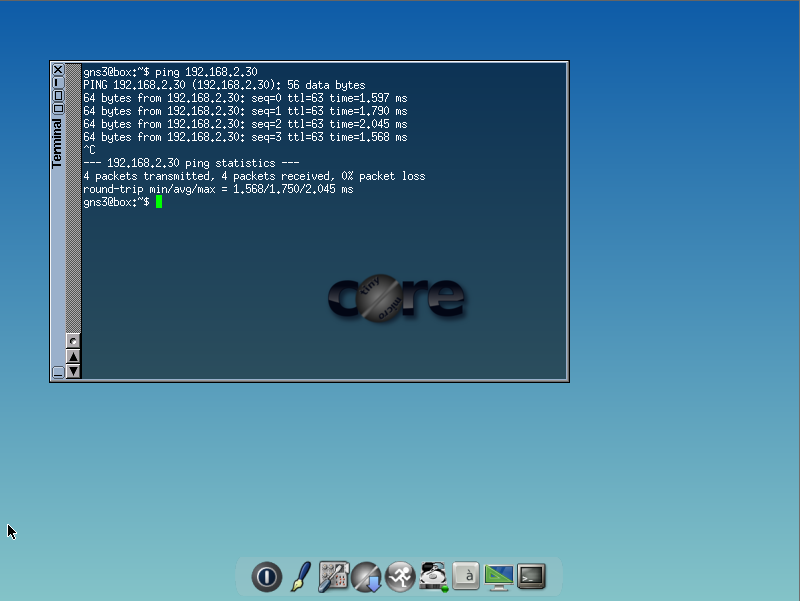
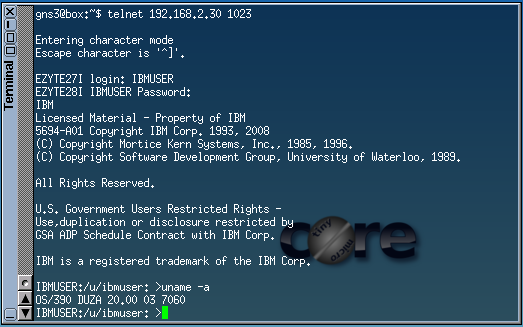
Telnet to the z/os mainframe’s unix shell
telnet 192.168.2.30 1023In few seconds you should get the following login screen

Provide IBMUSER / SYS1 credentials
Stop the z/os mainframe. In order to do that you need to go back to the main c3270 terminal session and issue the following commands:
S SHUTSYS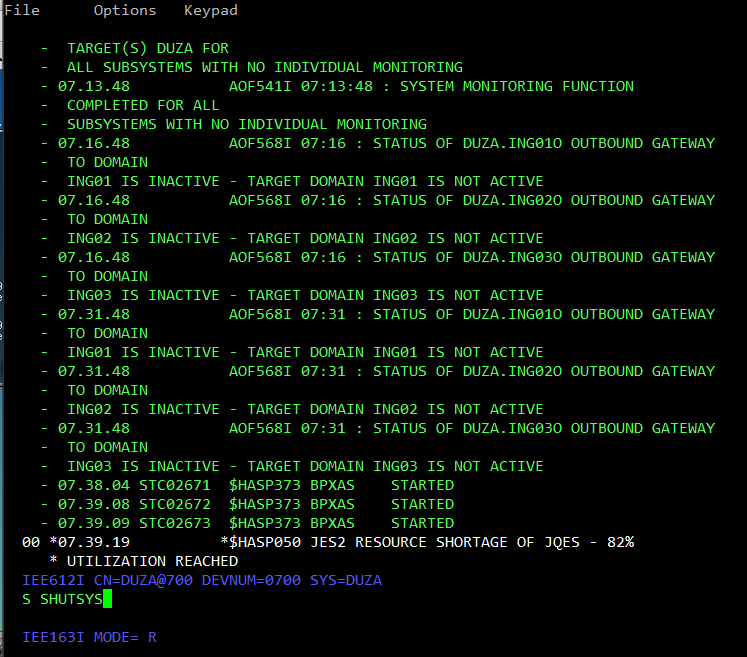
After few minutes, when you see shutdown complete, you will need to issue an additional stage shutdown command:
Z EOD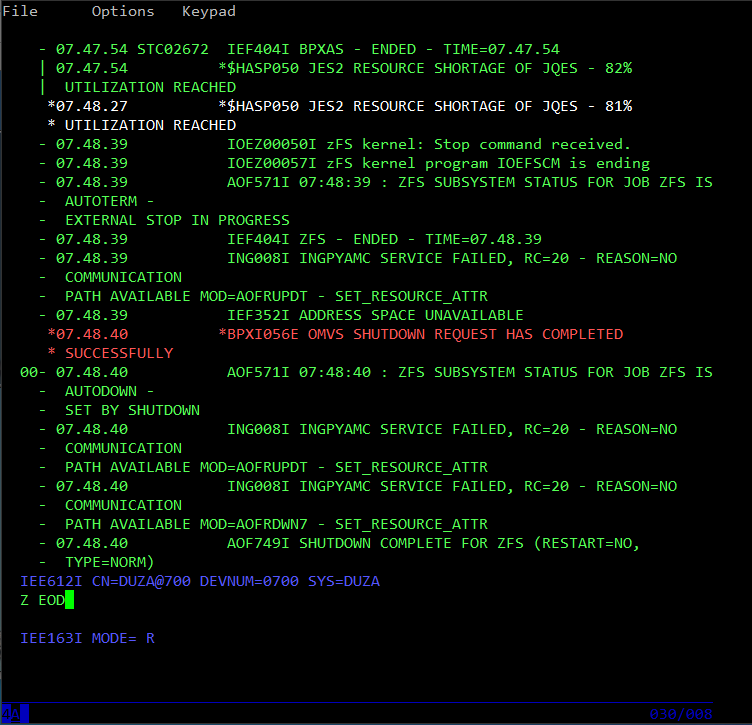
After succesful shutdown you should see

Now you are ready to transfer the working hard disk image to GNS3
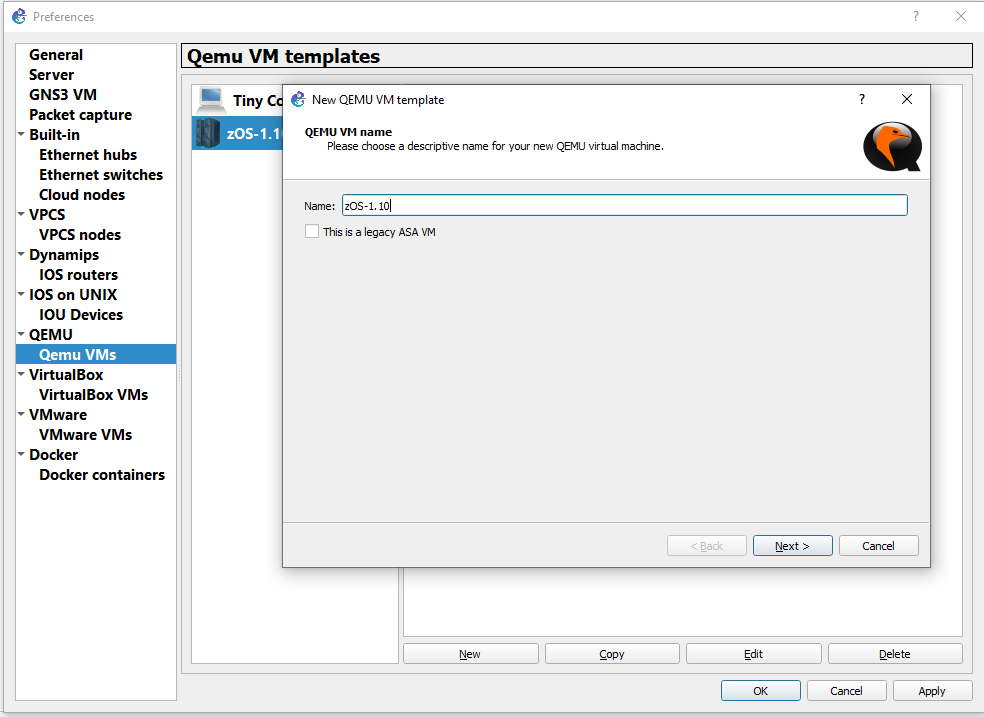
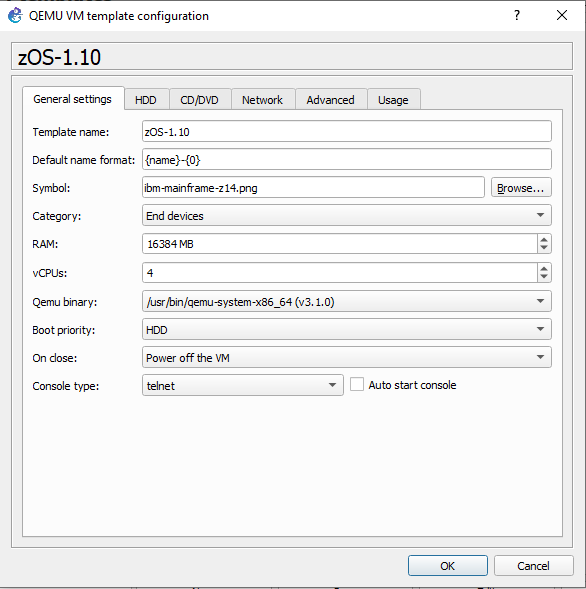
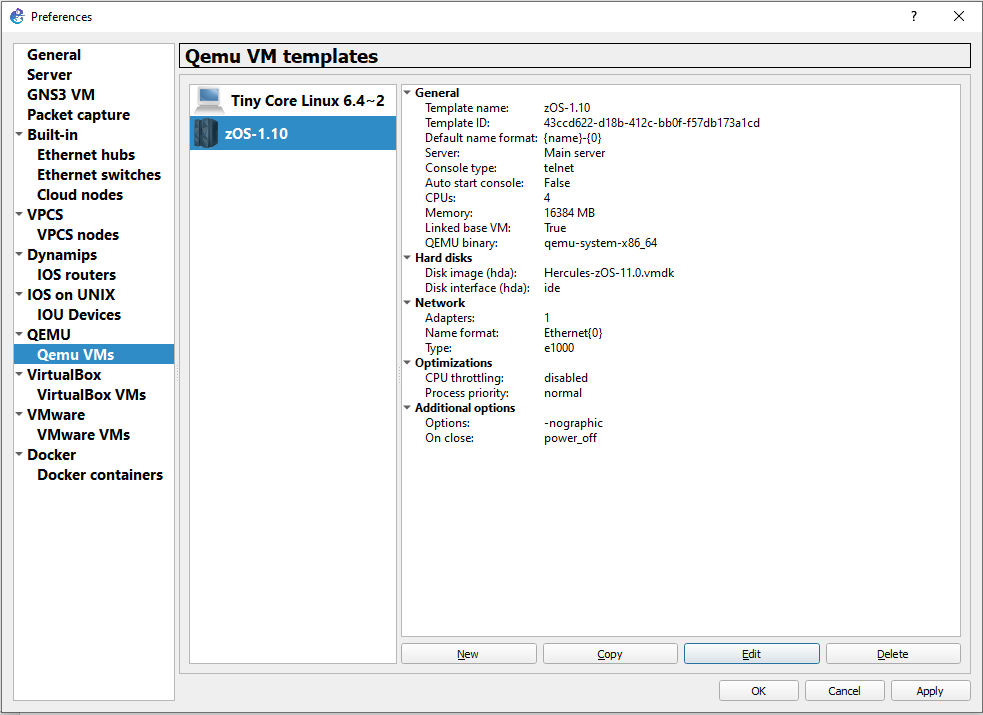
in GNS3 go to Edit / Preferences / QEMU / QEMU VMs and click to New
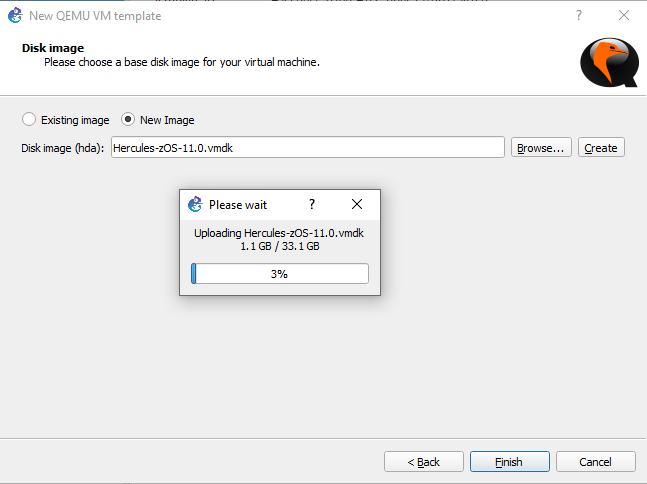
After the wizard uploading your z/os image to your GNS3 instance, you will be ready to start using in GNS3

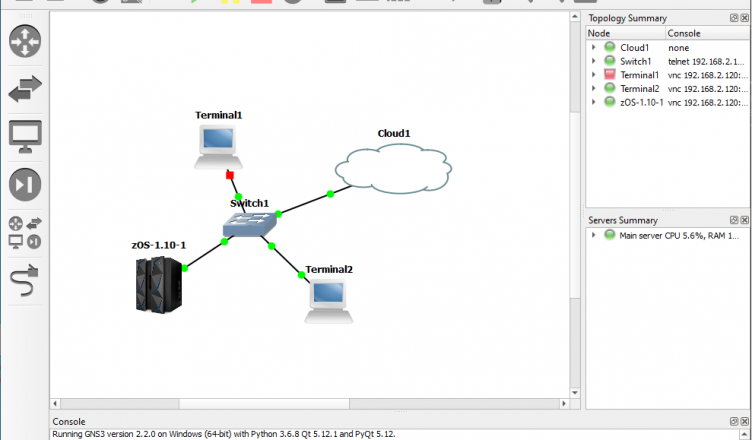
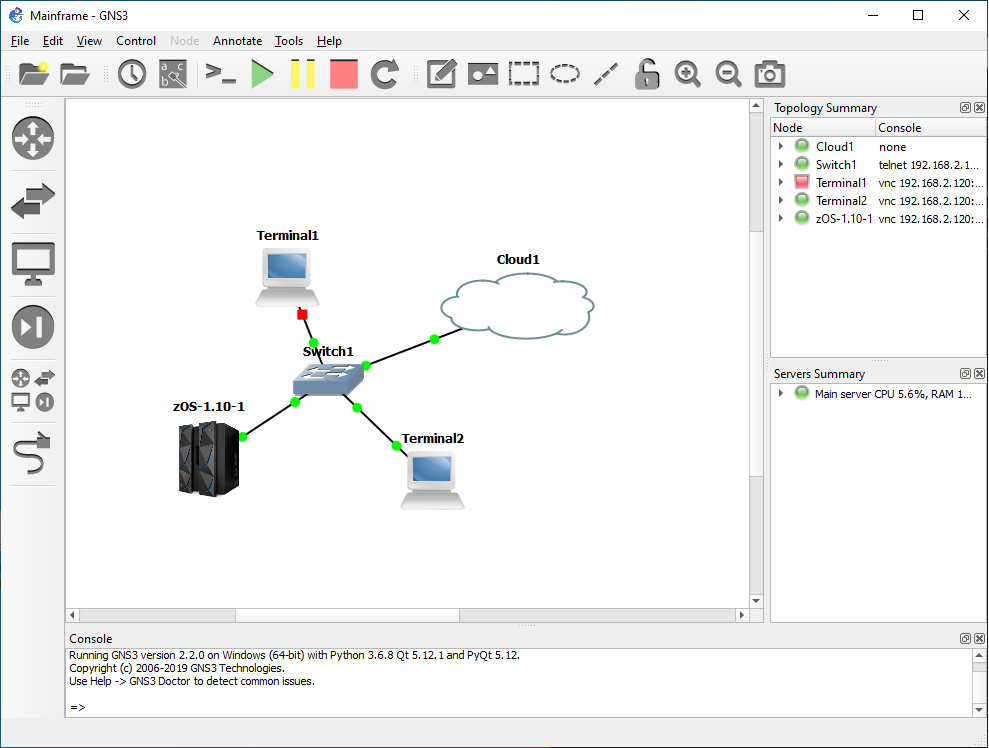
You should be able to drag and drop the zOS machine to your projects
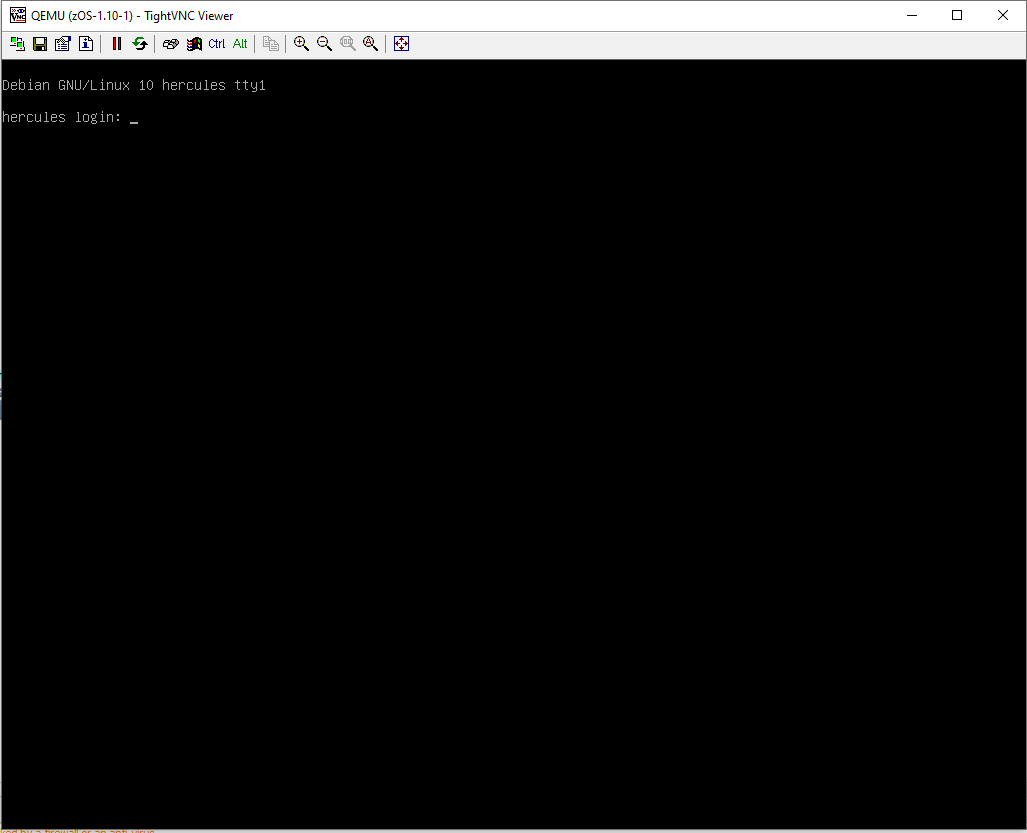
You should be able to open a console connection to the host os first (Debian) which is holding the Hercules emulator, where you will need to start hercules, c3270 terminal and start-up the z/os like described above again.
Share with: